Are you looking to expand your indoor garden without spending a dime? Propagating snake plants in water might be the perfect solution for you! As an indoor plant enthusiast, I’ve discovered that snake plants (Sansevieria or Dracaena trifasciata) are not only one of the most resilient houseplants but also incredibly easy to multiply through propagation. In this comprehensive guide, I’ll walk you through everything you need to know about propagating snake plants in water, along with alternative methods to ensure your propagation success.
Why Propagate Your Snake Plant?
Snake plants have earned their reputation as nearly indestructible houseplants that thrive even with minimal care. Their striking vertical leaves with distinctive patterns make them a stylish addition to any home. But why stop at just one plant when you can create an entire snake plant family?
Propagating your snake plant offers numerous benefits beyond simply multiplying your collection. It allows you to share these wonderful plants with friends and family, rescue damaged leaves, rejuvenate overgrown plants, and experiment with different growing techniques. Plus, there’s something incredibly satisfying about watching new roots and pups develop from a simple cutting.
Water propagation, in particular, has become increasingly popular among indoor gardeners because it allows you to witness the entire root development process. There’s something magical about seeing those first white roots emerge from a cutting submerged in water. While propagating snake plants in water requires patience, the results are well worth the wait.
Choosing the Perfect Time for Propagating a Snake Plant
While snake plants grown indoors can technically be propagated year-round due to consistent interior temperatures, they respond best when propagated during their active growing season. Spring and early summer provide ideal conditions as the plant naturally enters a growth phase, giving your cuttings the best chance of success.
Before propagating, ensure your snake plant is healthy and vibrant. As Chuck Pavlich, director of new product development for Terra Nova Nurseries, notes, “The best time is when they are healthy. Soft or flaccid foliage is an indication of things like root rot or insufficient hydration.” A strong, healthy parent plant will produce stronger, more resilient cuttings.
The Secret to Successfully Propagating Snake Plant in Water
Water propagation is perhaps the most fascinating method for multiplying your snake plants because it allows you to observe the entire root development process. However, it does come with some challenges. Snake plants are naturally averse to waterlogged conditions, which can increase the risk of rot. But with the right technique, you can achieve remarkable success.
Here’s the game-changing secret that transformed my snake plant propagation success rate: cutting the leaf diagonally both ways rather than straight across. This simple technique dramatically increases the surface area available for root development and significantly reduces the chance of rot. Let me walk you through the entire process step by step.
Materials You’ll Need for Water Propagation
Before getting started, gather these simple supplies:
A healthy, mature snake plant
Clean, sharp scissors or pruning shears
A small glass jar or vase
Fresh, room-temperature water
Optional: rooting hormone
Step-by-Step Guide to Propagating Snake Plant in Water
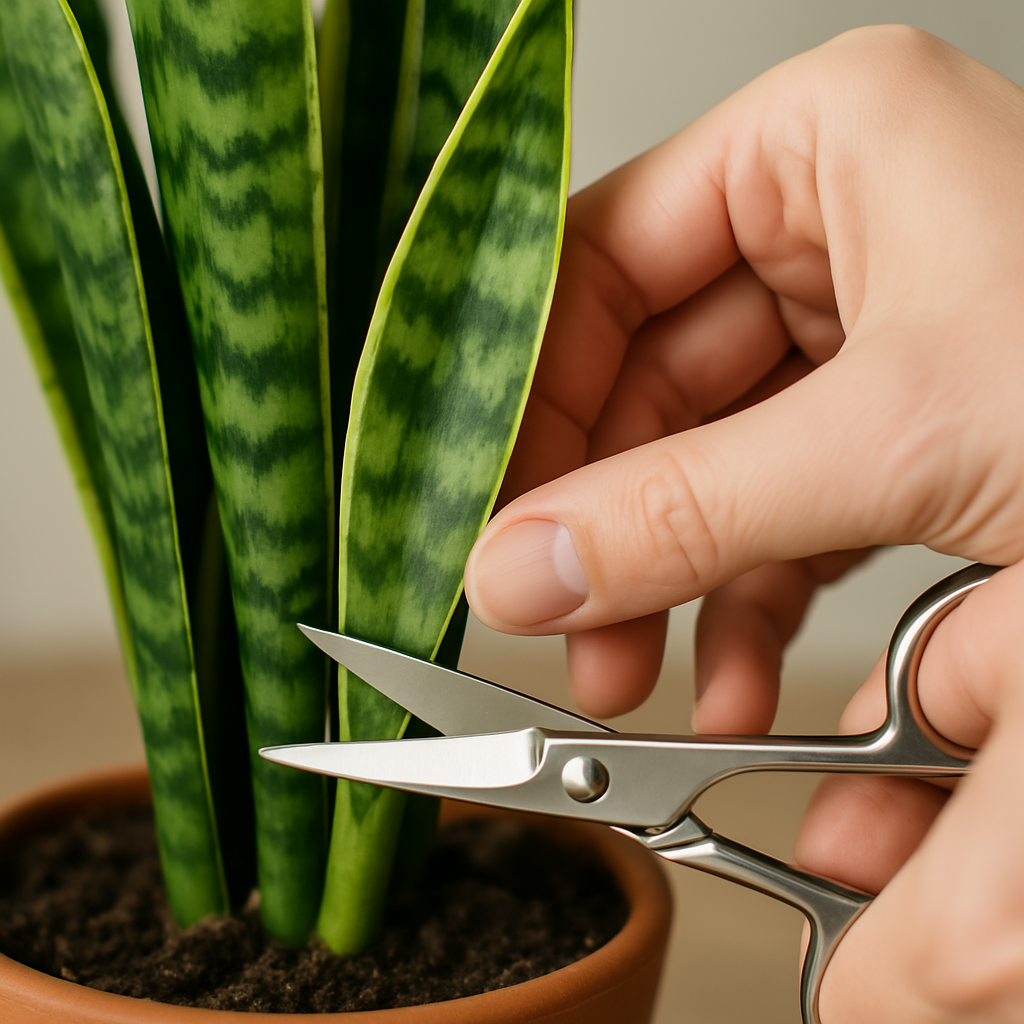
Select and Cut a Healthy Leaf: Choose a mature, healthy leaf from your snake plant. Using sterilized scissors or pruning shears, cut the leaf at the base, just above the soil line. Make a clean cut to minimize damage to both the parent plant and the cutting.
Selecting and cutting a healthy snake plant leaf at the base
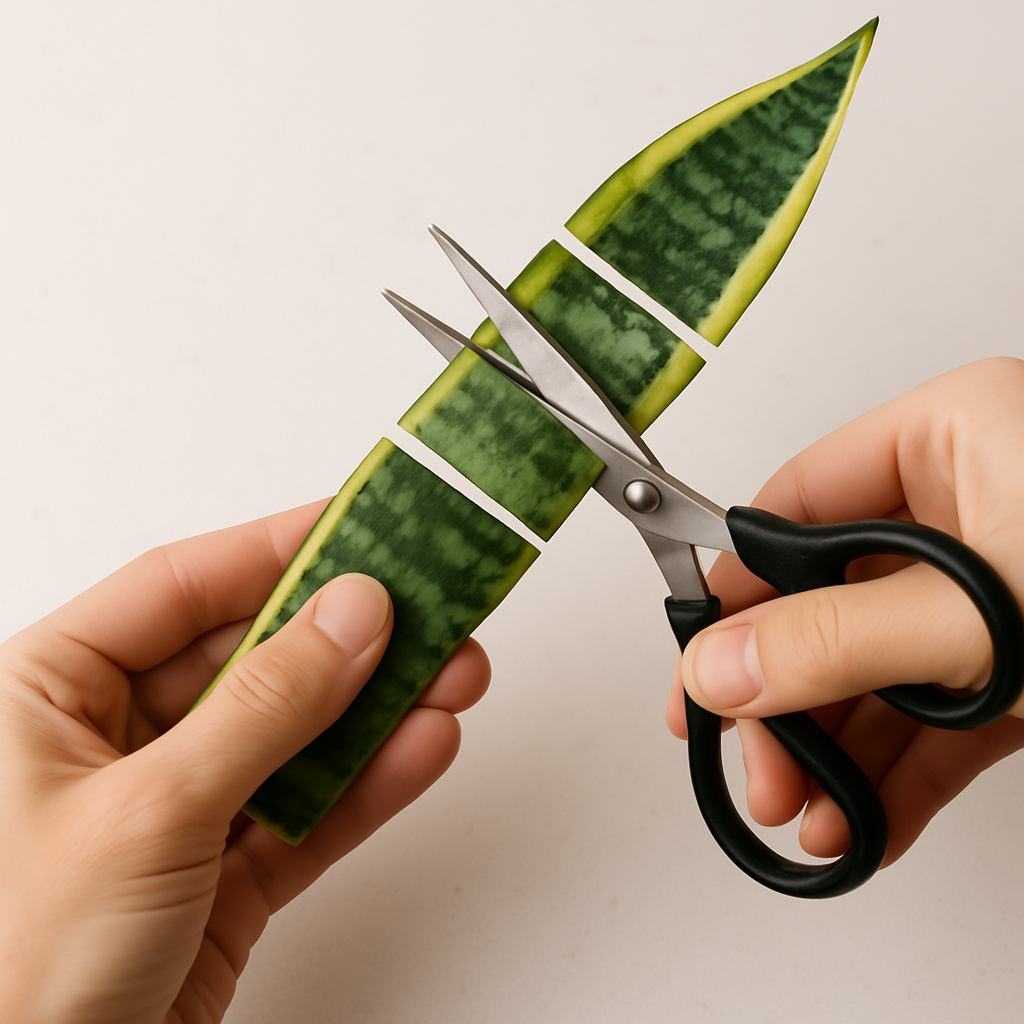
Section the Leaf (Optional): You can either propagate the entire leaf or cut it into several 3-4 inch sections to create multiple new plants. If sectioning, ensure you keep track of which end is the bottom (the end that was closest to the soil) as this is where roots will develop.
Sectioning a snake plant leaf into multiple cuttings
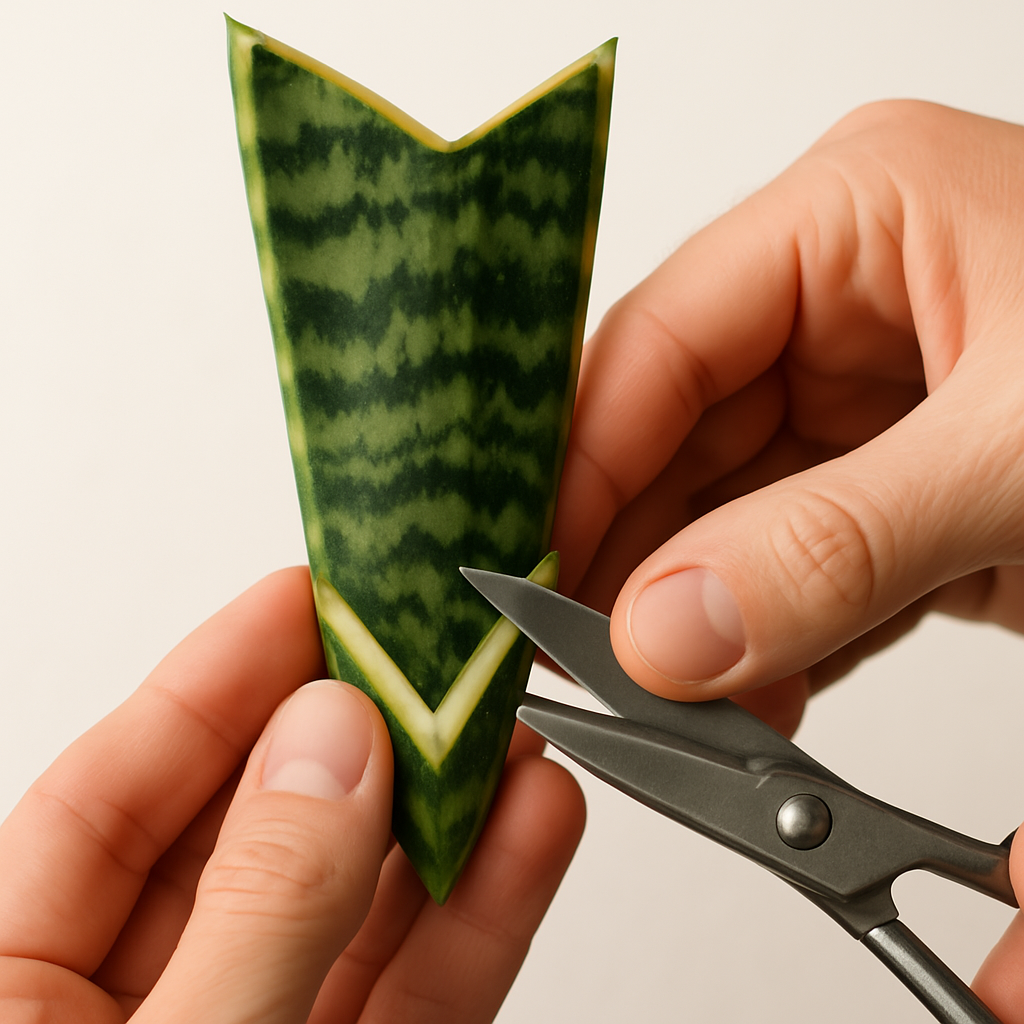
Create Diagonal Cuts: Here’s the crucial step that many guides miss! Instead of cutting straight across, cut the bottom of each section diagonally upward into a triangular or V-shape. This increases the surface area for root development and dramatically improves success rates.
Creating diagonal V-shaped cuts to increase surface area for root development
Allow Cuttings to Callus: Let your cuttings sit out for 1-2 days to allow the cut ends to callus or dry slightly. This helps prevent rot once placed in water.
Snake plant cuttings with callused ends after 1-2 days of drying
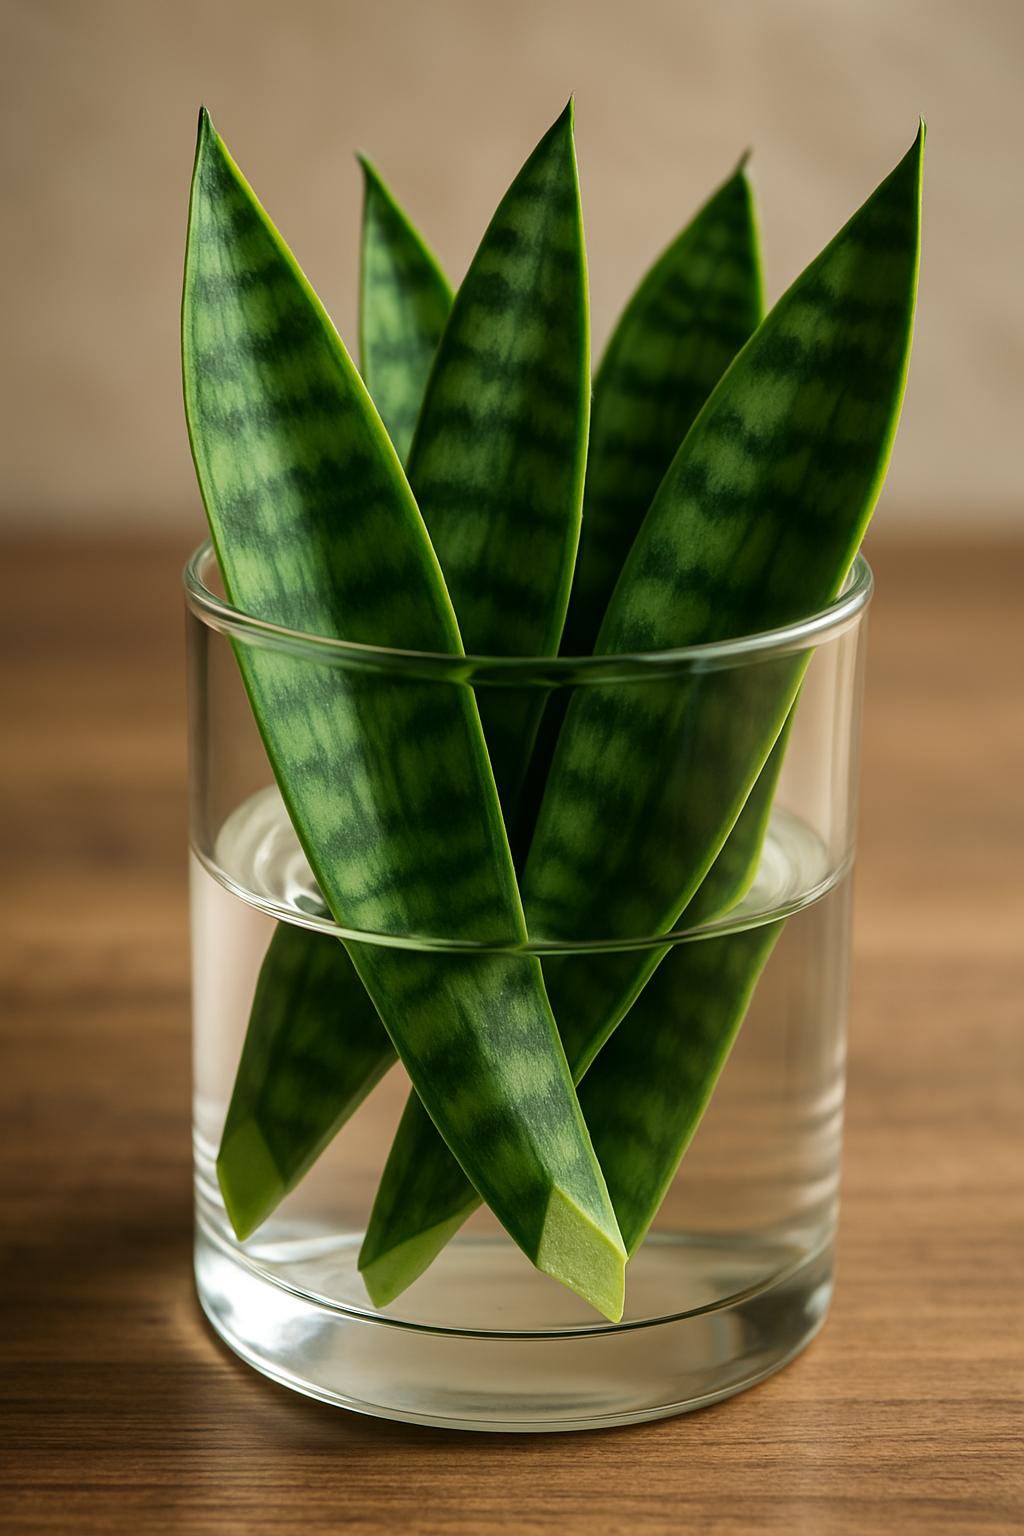
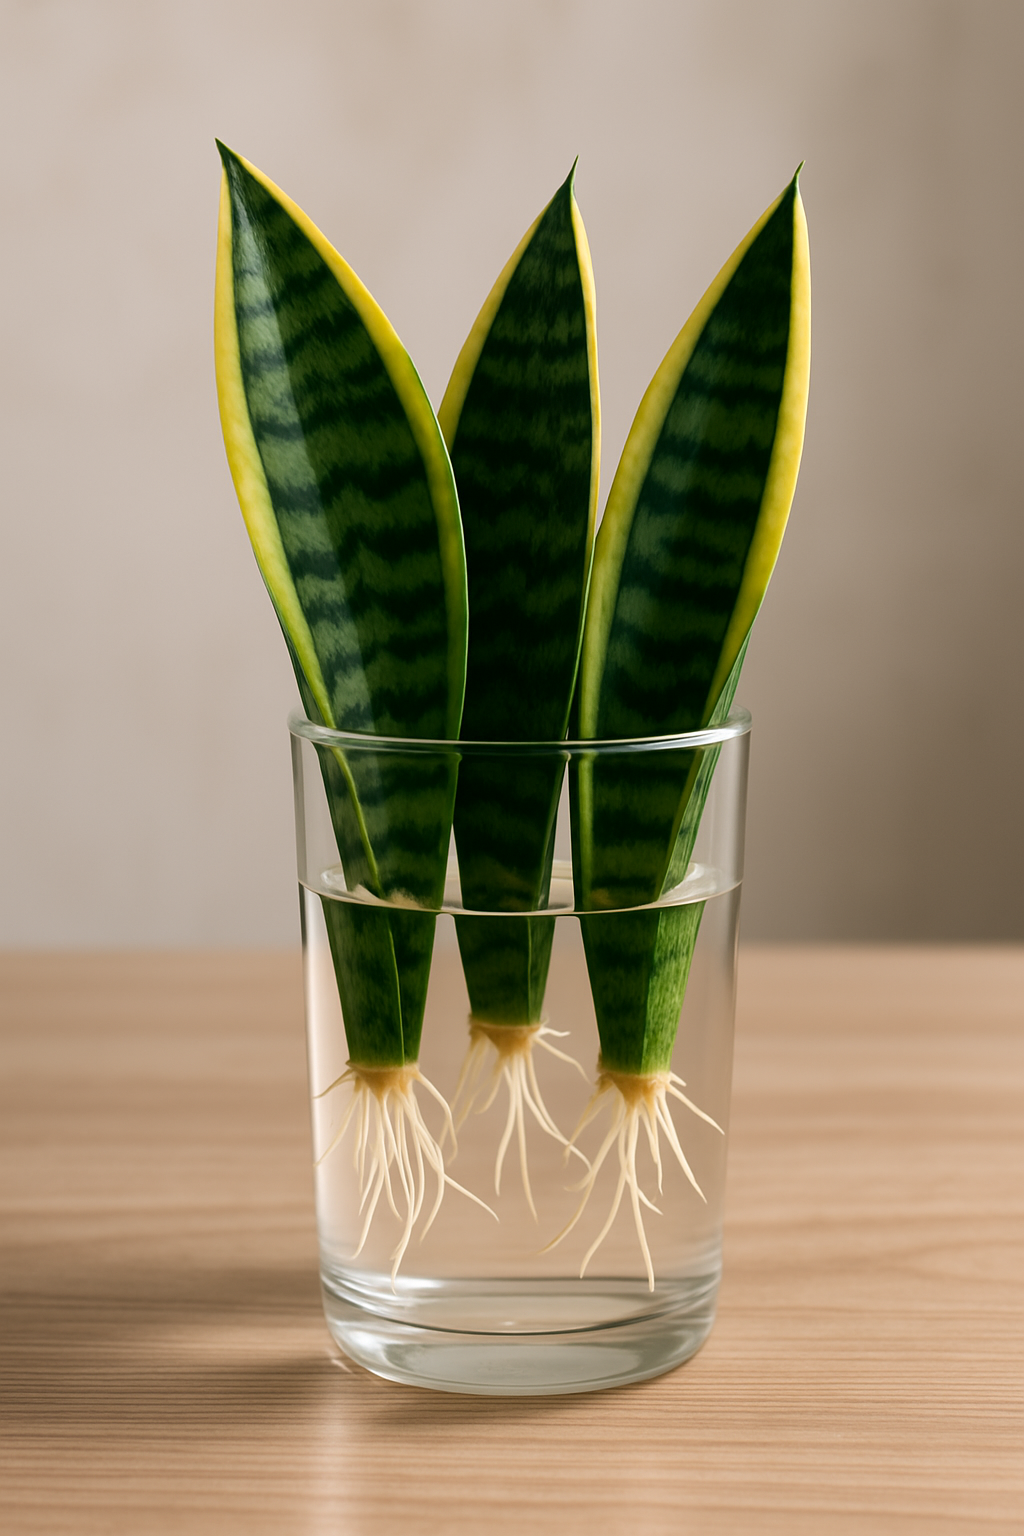
Prepare Your Container: Fill a small glass jar or vase with room-temperature water, enough to submerge about 1 inch of the cutting.
Position Cuttings Correctly: Place your cuttings in the water with the pointed (bottom) end submerged. Ensure the cuttings are oriented correctly—the end that was closest to the soil should be in the water, as this is where roots will form.
Snake plant cuttings positioned correctly in water with bottom ends submerged
Find the Perfect Spot: Place your container in a location that receives bright, indirect light. Direct sunlight can be too intense and may cause issues, while too little light will slow the rooting process.
Maintain Water Quality: Change the water every 1-2 weeks to keep it fresh and prevent bacterial growth. When refreshing the water, take the opportunity to rinse the container to remove any potential buildup.
The Waiting Game: What to Expect During Water Propagation
Patience is key when propagating snake plants in water. Unlike fast-rooting plants like pothos that develop roots within days, snake plants can take anywhere from 3-8 weeks to begin developing roots. In some cases, it might take 2-3 months before you see substantial root growth.
Snake plant cuttings developing white roots after several weeks in water
During this time, you might notice some changes in your cuttings. The cut end may develop a slight callus, and eventually, you’ll see small white bumps forming—these are the beginning of root development. As long as your cutting remains firm and doesn’t show signs of rot (becoming soft, mushy, or discolored), it’s likely still viable.
Once roots reach about 1-2 inches in length, your cutting is ready for the next stage. Some gardeners prefer to wait until they see new pups (baby plants) forming before transitioning to soil, but this can take considerably longer.
Transitioning Water-Propagated Snake Plants to Soil
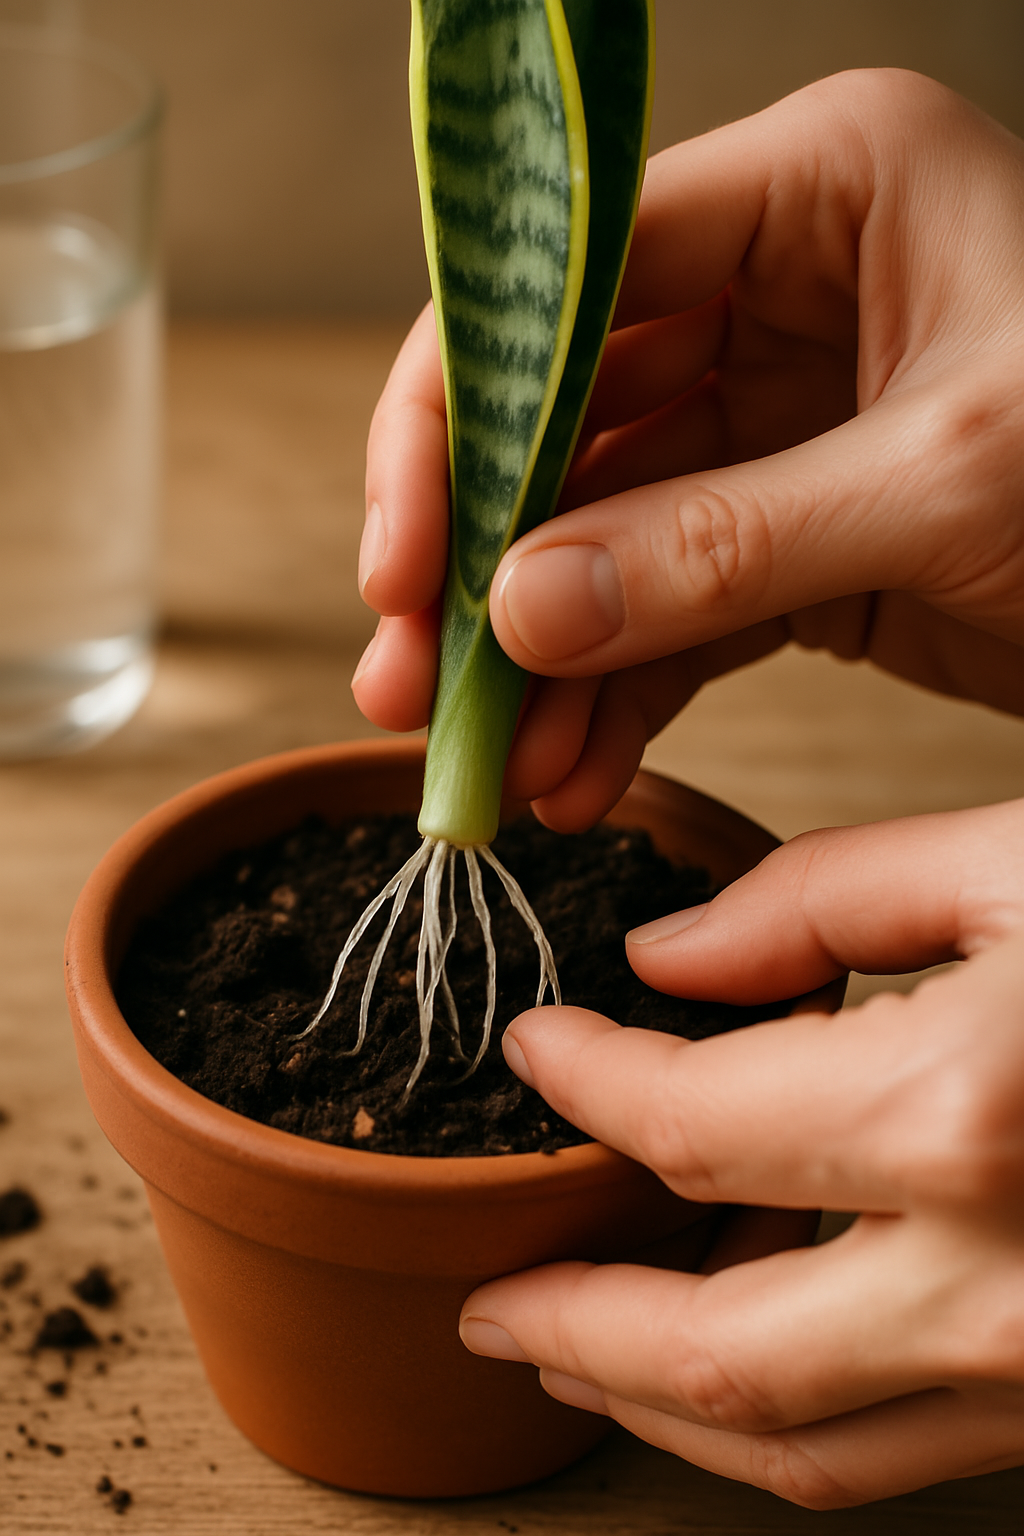
When your snake plant cutting has developed a healthy root system in water, it’s time to transition it to soil. This transition requires some care, as roots that develop in water have different characteristics than those that develop in soil.
Planting a rooted snake plant cutting in well-draining soil
Here’s how to successfully transition your water-propagated snake plant to soil:
Prepare the Right Soil Mix: Snake plants prefer well-draining soil. A cactus or succulent mix works well, or you can create your own by mixing regular potting soil with perlite or coarse sand for improved drainage.
Choose an Appropriate Container: Select a pot with drainage holes that’s slightly larger than the root system of your cutting. Too large a pot can lead to overwatering issues.
Plant Carefully: Make a hole in the soil and gently place your rooted cutting, ensuring the roots are spread out and not cramped. The cutting should be planted at the same depth it was growing in water.
Initial Watering: Water thoroughly after planting, allowing excess water to drain completely. This initial watering helps settle the soil around the roots.
Acclimation Period: For the first 1-2 weeks, keep the soil slightly more moist than you normally would for an established snake plant. This helps the water-developed roots adjust to soil conditions. Gradually reduce watering frequency to allow the plant to adapt to typical snake plant care.
Placement: Keep your newly potted cutting in bright, indirect light and away from drafts or extreme temperature fluctuations during this transition period.
A newly potted snake plant cutting after successful transition from water to soil
Alternative Methods for Propagating a Snake Plant
While water propagation is fascinating and rewarding, there are other effective methods for propagating snake plants that you might want to explore.
Soil Propagation Method
Propagating snake plants directly in soil can reduce the risk of rot and eliminate the need for a transition period from water to soil.
Prepare Cuttings: Follow the same process as water propagation for selecting and cutting leaves.
Allow Callusing: Let the cuttings callus for 2-3 days to reduce the risk of rot.
Optional Rooting Hormone: Dip the cut end in rooting hormone to encourage faster root development.
Plant in Well-Draining Soil: Use a well-draining cactus or succulent mix in a small pot with drainage holes.
Proper Depth: Insert the cutting about 1/2 to 1 inch deep into the soil, ensuring it’s stable and upright.
Watering: Water sparingly, keeping the soil just slightly moist but never soggy. Too much moisture can cause rot.
Environment: Place in bright, indirect light and maintain warm temperatures between 65-80°F (18-27°C).
With soil propagation, you won’t be able to see root development, but you can gently tug on the cutting after a few months—resistance indicates root growth.
Division Propagation Method
Division is perhaps the most foolproof method for propagating snake plants, especially for larger, mature plants with multiple stems or pups.
Remove the Plant: Carefully remove the entire snake plant from its pot.
Separate Naturally Occurring Sections: Identify natural divisions where the plant has produced pups or separate growth points.
Gentle Separation: Carefully separate these sections, ensuring each has some roots attached. You may need to use a clean knife for tightly bound root systems.
Repot Divisions: Plant each division in its own pot with fresh, well-draining soil.
Care After Division: Water lightly and place in appropriate light conditions. The divisions should establish quickly since they already have developed root systems.
Division provides instant new plants without the waiting period required for cuttings to develop roots, making it ideal when you want immediate results.
Troubleshooting Common Snake Plant Propagation Issues
Even with the best techniques, you might encounter some challenges when propagating snake plants. Here are solutions to common problems:
Rotting Cuttings
If your cuttings become soft, mushy, or discolored, they’re likely rotting. This is the most common issue with water propagation.
Solution: Remove any rotting portions immediately. Ensure you’re using the diagonal cutting method, changing water regularly, and not submerging too much of the cutting. If the problem persists, try soil propagation instead.
Slow or No Root Development
Snake plants naturally take time to root, but if you’re seeing no progress after 2-3 months, something might be wrong.
Solution: Check light conditions—too little light slows root development. Ensure water is being changed regularly. Consider trying a rooting hormone or increasing the ambient temperature slightly, as warmer conditions can encourage growth.
Cuttings Shrivel or Wrinkle
If your cuttings are losing moisture and shriveling, they might be drying out or using their stored moisture before roots develop.
Solution: For water propagation, ensure the water level remains consistent. For soil propagation, slightly increase watering frequency while still avoiding soggy conditions.
Yellowing Leaves During Propagation
Some yellowing of the original cutting is normal as the plant redirects energy to root development.
Solution: As long as the cutting remains firm and shows signs of root development, minor yellowing isn’t concerning. Once new growth appears, the plant will typically regain its vibrant color.
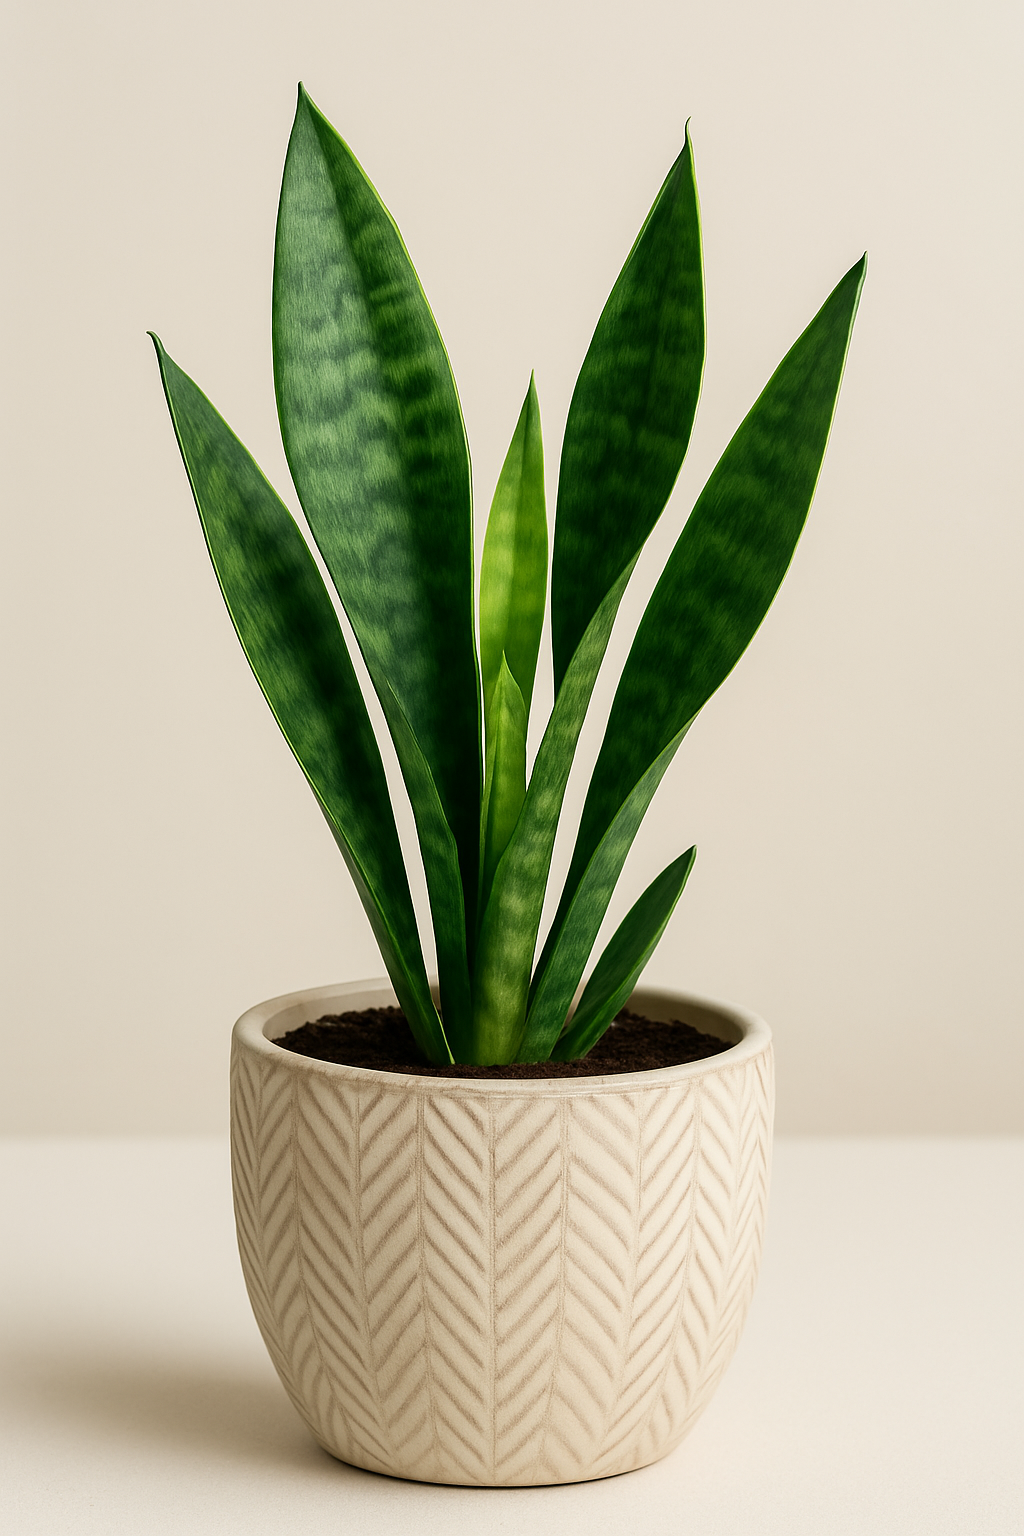
Caring for Your Newly Propagated Snake Plants
Once your propagated snake plants have established roots and begun showing new growth, they’ll need proper care to thrive:
Light: Place in bright, indirect light. While snake plants tolerate low light, they grow best with good light exposure.
Watering: Allow the soil to dry completely between waterings. Snake plants are drought-tolerant succulents that prefer underwatering to overwatering.
Temperature: Maintain temperatures between 65-85°F (18-29°C). Avoid exposing to temperatures below 50°F (10°C).
Fertilization: Feed sparingly with a balanced houseplant fertilizer diluted to half strength during the growing season (spring and summer).
Pot Size: Snake plants prefer to be slightly root-bound, so don’t rush to repot into much larger containers.
A successfully established snake plant after propagation, showing healthy new growth
Final Thoughts on Propagating Snake Plants in Water
Propagating snake plants in water is a rewarding process that allows you to multiply your plant collection while observing the fascinating development of new roots and growth. While it requires patience, the diagonal cutting technique significantly improves success rates and reduces the risk of rot.
Whether you choose water propagation, soil propagation, or division, expanding your snake plant collection is an enjoyable and cost-effective way to enhance your indoor garden. Each method has its advantages, and you might find it fun to experiment with different techniques to see which works best for your specific conditions. Propagate Snake Plants.
Remember that propagation success often comes with practice, so don’t be discouraged if your first attempt isn’t perfect. With each propagation project, you’ll gain valuable experience and soon be sharing beautiful snake plant babies with friends and family!
Have you tried propagating snake plants before? Which method worked best for you? The joy of plant propagation is that there’s always something new to learn and discover in the wonderful world of indoor gardening.
Frequently Asked Questions About Propagating Snake Plants
How long does it take for snake plant cuttings to root in water?
Snake plant cuttings typically take 3-8 weeks to begin developing roots in water, with substantial root growth often taking 2-3 months. The entire process from cutting to a well-established plant with new growth can take 4-6 months.
Will my propagated snake plant maintain the same variegation as the parent plant?
When propagating through division, the new plants will maintain the same variegation pattern as the parent. However, when propagating through leaf cuttings (in water or soil), the new plants may lose some variegation or revert to the solid green form.
Can I propagate a snake plant from a damaged leaf?
Yes, as long as the leaf section is healthy and not diseased, you can propagate from a damaged leaf. Simply cut away any damaged portions and use the healthy sections for propagation.
How many new plants can I get from one snake plant leaf?
A single long leaf can be cut into multiple 3-4 inch sections, with each section potentially developing into a new plant. A typical mature leaf might yield 3-5 new plants.
Is it better to propagate snake plants in water or soil?
Both methods can be successful. Water propagation allows you to monitor root development, while soil propagation may reduce the risk of rot and eliminates the transition period. The best method depends on your preferences and growing conditions.
Ready to Take Your Writing to the Next Level?
Whether you’re writing plant guides, blog posts, or any other content, having the right tools makes all the difference. Discover how to enhance your writing with advanced paraphrasing, grammar checking, and style improvements.
We use cookies to ensure that we give you the best experience on our website. If you continue to use this site we will assume that you are happy with it.OkPrivacy policy